Setting Folder Permissions on the Research Data Store
Danger
Please be aware that making a mistake in setting permissions may give others using BEAR access to your data or stop you from accessing your data. If you need help, please log a call via the IT Service Desk.
By default, all members of a BEAR project (see BEAR Project Registration) get read and write access to the project storage (Research Data Store). This page explains how you can change these settings, so that researchers can have different permissions on separate subdirectories. Please follow the instructions carefully as if you make a mistake, you can affect group access to the project storage. If this happens then the BEAR team can reset all permissions back to the default settings - the Principal Investigator (PI) of the project or designated Data Manager will need to log an Other BEAR Request ticket on the Service Desk.
Note
You will need a Windows computer to set up folder permissions and you must not be working offline - see our blog post for further information.
Research Group Scenario
Yoda is the PI of a Research Data Store with the project code yoda-teleport. The researchers listed below were granted access either when the project was either:
- created via a Request a new BEAR Project ticket
- edited via an Edit a Single BEAR Project ticket
| Name | Position |
|---|---|
| Yoda | PI |
| Luke Skywalker | Researcher |
| Han Solo | Researcher |
| Chewbacca | Researcher |
| Darth Vader | Researcher |
| C-3PO | Researcher |
| R2-D2 | Researcher |
The folder structure with desired subdirectory permissions is shown below:
%%{
  init: {
    'flowchart': {
      'curve': 'stepBefore',
      'htmlLabels': false
    },
    'themeVariables': {
      'fontSize': '14px'
    }
  }
}%%
flowchart LR
    classDef perm stroke-dasharray: 5 5

    M:::perm
    X:::perm
    Y:::perm
    Z:::perm

    subgraph "top-level permissions"
        M(
            These permissions
            are set automatically,
            based on BEAR project
            membership.
        )
    end

    M -.-> A

    subgraph "directory structure"
        A["yoda-teleport"]
        A === B[Folder A]
        A === C[Folder B]
        A === D[Folder C]
    end

    subgraph "subdir permissions"
        X(
            Yoda: **rwx**
            Luke Skywalker: **rwx**
            Han Solo: **rwx**
        )
        Y(
            Yoda: **rwx**
            Chewbacca: **rwx**
            Darth Vader: **rwx**
        )
        Z(
            Yoda: **rwx**
            C-3PO: **rwx**
            R2-D2: **r-x**
        )
    end

    B -.- X
    C -.- Y
D -.- Z- Yoda needs to read and write to all subdirectories within the yoda-teleport project storage.
- Luke Skywalker and Han Solo need read and write permissions to
Folder Aonly. - Chewbacca and Darth Vader need read and write permissions to
Folder Bonly. - C-3PO needs read and write permissions to
Folder Conly and R2-D2 needs read permission toFolder Conly. - R2-D2 needs read permission to
Folder Conly.
How to set the permissions
The main directory permissions are set by default – please do not attempt to change these as they could give everyone using BEAR the permission to see your data. Note that to add any users to a particular subdirectory they must already have access to the applicable BEAR project's storage (RDS).
-
Go to File Explorer and navigate to your project storage folder. Start by creating your three subdirectories - in this case "
Folder A", "Folder B" and "Folder C". -
Right-click on "
Folder A" and click on Properties. Navigate to the Security tab.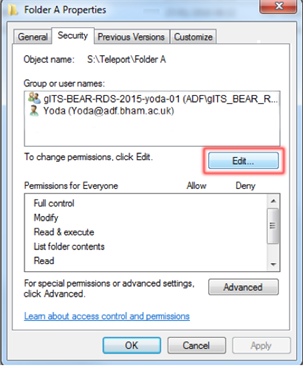
-
Yoda (the PI of the project) is already listed and has full control permissions which are inherited from the top-level directory - this means they can still access and delete any files in any subdirectories regardless of any permissions protecting the folder. gITS-BEAR-RDS-2015-yoda-01 is the group that has access by default when the folder was created - this will need to be removed (see later).
-
To add users, click 'Edit' (see above screenshot) and then 'Add':

-
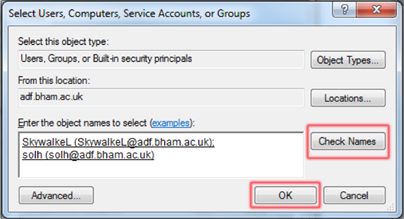
Type the user's name or username and click 'Check Name'. More than one user can be added by putting a semicolon between names. Click 'OK' to continue:
-
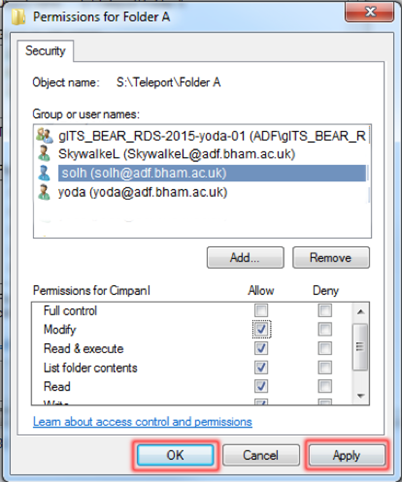
By clicking on the username, you can see what permissions are assigned to that user. In this case, Han Solo and Luke Skywalker both require Read and Write permissions so tick the box for 'Modify'. Click 'Apply' and 'OK' to continue.
-
Once you have added the users and their permissions, you will need to delete the group permissions for
gITS_BEAR-RDS-_projectname_that are inherited from the top-level folder otherwise all the group members will still be able to access it. If you see permissions relating to 'Creator' or 'Owner' DO NOT remove these, otherwise the person who created the file(s) will no longer have access. -
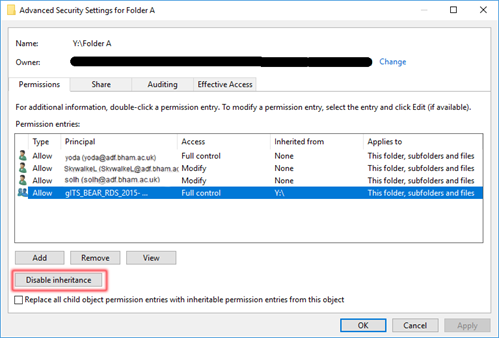
In the 'Security tab' click on the 'Advanced' button.
-
Select the group by left-clicking on it and then click on 'Disable Inheritance'.
-
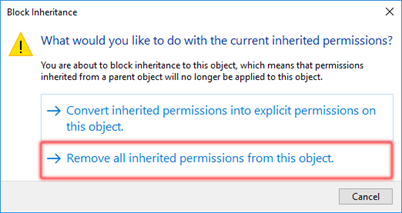
A window with two options should pop-up, choose 'Remove all inherited permissions from this object':
-
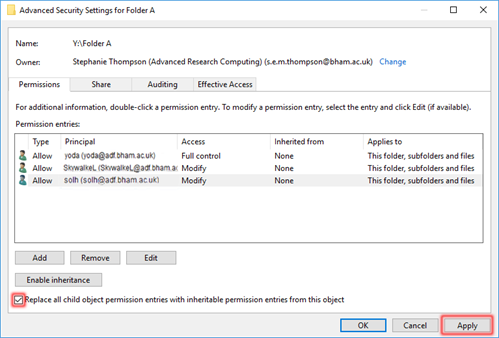
The list of permissions should now just show the users that you have added without the group:
-
If there is any data already in the subdirectory you are setting permissions on, you will need to tick the box for 'Replace all child object permissions...' - this will change all existing files and folders there to the new permissions.
-
Click 'Apply', you should see a pop-up window saying that it is setting security information and if you have replaced permissions then you will need to click 'yes' in the pop-up box below.

-
It may take a while to complete if there are many existing files/folders there. Then click 'OK' to close both windows.
-
Continue this process with Folder B and Folder C. In the example for Folder C, you would not need to change permissions for R2-D2 because the default permissions are set to Read.
Info
The screenshots in this guide were taken on a computer running Windows 10, version 1803.
Further Help
If you get into difficulties with setting permissions then please log an Other BEAR Request ticket through the Service Desk. You can also visit us in person at our regular BEAR Drop-in Sessions.